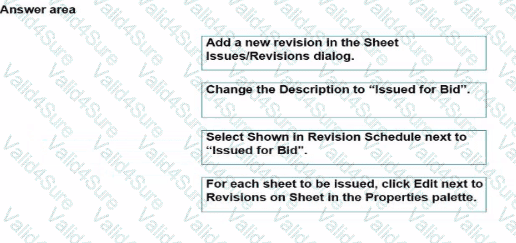
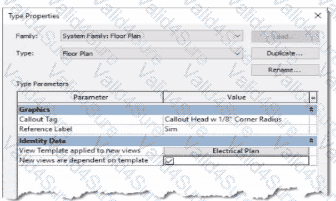
What RVT_ELEC_01101 Questions and Answers feature?
RVT_ELEC_01101 Valid and Updated Autodesk Certified Professional in Revit for Electrical Design Q&A Dumps
Turn your ambition into achievement
Valid4sure’s proven and exam-focused Autodesk Certified Professional in Revit for Electrical Design RVT_ELEC_01101 questions and answers are trusted by exam candidates in all parts of the world. This go-to resource paves the way to win confidently your dream certification and launch a rewarding career.
Autodesk Certified Professional in Revit for Electrical Design RVT_ELEC_01101 Dumps - A Critical Tool for Exam Prep
Autodesk Certified Professional in Revit for Electrical Design RVT_ELEC_01101 Exam Dumps Questions mirror the actual exam scenario; letting you know all types of questions, their accurate answers and the most significant exam topics. Practicing with these questions and answers helps you develop your command on the actual exam format, learn to manage time during the exam and strengthen your knowledge on key domains of the exam syllabus.
Intuitive Autodesk Certified Professional in Revit for Electrical Design Testing Engine for Realistic Exam Experience
Valid4sure introduces the most intuitive Autodesk Certified Professional in Revit for Electrical Design testing engine with enhanced features to let you go through the real exam experience. This powerful platform can produce a number of real exam simulations to help you know the level of your exam preparation, identifying knowledge gaps and improve them before taking the exam. Valid4sure’s testing simulator can be downloaded on any computing device and used as per your convenience. This actual test day practice fills you with confidence to beat the exam with absolute certainty.
Pathway to a hassle-free success in RVT_ELEC_01101 Certification Exam
Valid4sure is a time-tested study resource that has helped thousands of exam candidates to transform their dreams of achieving RVT_ELEC_01101 Certification into reality. Valid4sure’s meticulously-developed RVT_ELEC_01101 PDF study guide covers the entire exam syllabus in easy to learn and to-the-point questions and answers. The best part is that Valid4sure ensures you exam success with 100% money back guarantee.
24/7 Online Help for RVT_ELEC_01101 Prep
Valid4sure’s online support is available to its customers round-the-clock. They can contact the the customer service whenever they like and get comprehensive answers to their queries on any issue related to Autodesk Certified Professional in Revit for Electrical Design RVT_ELEC_01101 exam and guidance on Valid4sure’s PDF Study Guide, Dumps and RVT_ELEC_01101 Practice Tests. Valid4sure is active 24/7.